
Quickspin Gaming, a subsidiary firm of Microgaming has announced their latest video slot named “Second Strike”. This new title is available in both desktop and mobile platforms, allowing for punters to enjoy this slot at all moments during the day.
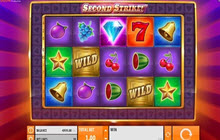
Second Strike has been crafted with 5 reel, 10 paylines and a host of features. This slot takes on a classic approach, providing punters with a reminiscent experience. There are wilds, free spins and scatters available to be triggered as well. Quickspin is currently offered throughout twenty-five different casinos, this developer also has content deals through Relax Gaming which has allowed for Quickspin to expand their portfolio throughout different regions in the world. This’ll give punters an easier time at accessing all the slots that this subsidiary firm of Microgaming has to offer.
Daniel Lindberg, the CEO at Quickspin commented on this games release stating, “Second Strike is a great new game that’ll boost the engagement players have with their experience. It’s a simple yet elegant game that we believe our fans, licensees and providers will all thoroughly enjoy. We can’t wait to start off the next year with a big new slot, it’s one we’ve been working on for months now and can’t wait to introduce to the scene.”
It seems that Quickspin is working on a new title which’ll be released in January 2016. This new game is rumored to provide punters with a never before gambling experience. If that’s to be true is a whole other story though. None the less Second Strike can be played today, now!